Introduction:
Now-a-days we are more attracting towards smart phones and applications to connect with your friends and families. Technology is growing faster and it is helping us to achieve things easily. By using this technology, we are making devices to interact with us and by sharing data across all boundaries.
In this context, think if you able to control AC appliances through your smart phone!! Yes, this article is going to do the same by detailing about the concept behind this idea.
This article is divided
into two halves,
1.
Controlling LEDs using ARDUINO and HC-05 Bluetooth
Module 2.
Controlling AC Appliances using ARDUINO and HC-05
Bluetooth Module. (Extra care should be taken when doing this)
Required Components: (1st Half - Using LED)
1.
ARDUINO 2.
HC-05
Bluetooth Module 3.
6 Jumper Male
Pins 4.
Bread Board 5.
1K OHM
Resister and 1 LED
Circuit Design:

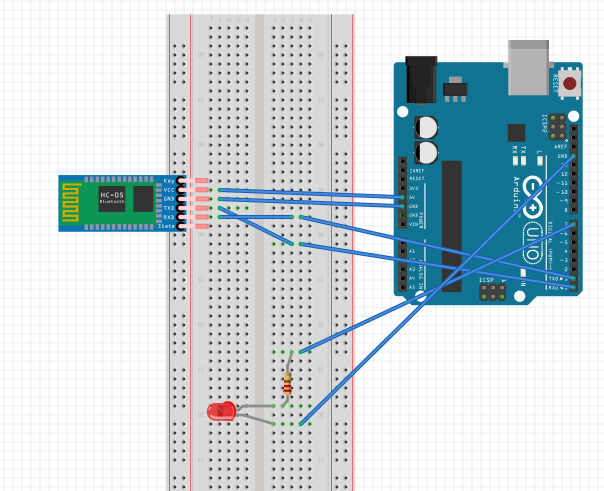
Step 1: Connect ARDUINO with HC-05 Bluetooth Module
HC-05 is a serial port
module and it can be easily connected to ARDUINO in few minutes. Connect HC-05
with ARDUNIO as mentioned below.
ü Connect “VCC” in HC-05 to 5V of ARDUINO. (First
try to connect with 3V, if HC-05 module is not blinking after all connections,
then connect with 5V) ü Connect “GND” with “GND” in ARDUINO. ü Connect “Tx” pin with “Rx” in ARDUINO. ü Connect “Rx” pin with “Tx” in ARDUINO.
Now connect the ARDUINO –
USB cable, HC-05 starts blinking indicates we are properly connected the
circuit and can go ahead with further steps.
Step 2: Connect
LED with ARDUINO
Now it is time to connect
the LED with ARDUINO.
ü Connect +ve (longer Pin) of LED with 220 ohm to
1 K ohm resistor. This is important step to keep LED alive for longer period. ü Connect other end of resistor to Pin 8 of
ARDUINO. ü Connect –ve (Shorter Pin) of LED to GND of
ARDUINO
Step 3: Upload UNO Code Sketch
Given below the code to Turn ON/OFF LEDs. Copy and Paste it in ARDUINO Code explorer and burn the code in ARDUINO by selecting required COM Port (Rx & Tx Pin connected to HC-05 should be removed when uploading sketch)
After uploading, connect “Rx”
and “Tx” pin respectively with HC-05 as it was before.
Code Sketch:
/* Turn LED On/Off
using ARDUINO & Bluetooth Module Input values: IF Value is 1
(LED To Turn ON) IF Value is 0
(LED To Turn OFF) */ int ledPin = 8; String ledOn =
"1"; String ledOFF =
"0"; String
inputString=""; char removeChar; void setup() { Serial.begin(9600); pinMode(ledPin, OUTPUT); }
void loop() { if(Serial.available()){ while(Serial.available()) { // reading the input char inputChar = (char)Serial.read(); //
Appending Char to Form String of Characters. inputString += inputChar; } Serial.println(inputString); while (Serial.available() > 0) { // clearing serial buffer if any. removeChar = Serial.read() ; } if(inputString == ledOn){ // Setting LED To ON. digitalWrite(ledPin, HIGH); } else if(inputString == ledOFF){ // Setting LED To OFF. digitalWrite(ledPin, LOW); } // Setting inputString to OFF. inputString = ""; } }
That’s all, Follow the steps to Turn ON/OFF LED.
1. Burn
the ARDUINO code into ARDUINO (by disconnecting RX and TX Pins to proper
uploading)
2. Download
“Bluetooth Terminal” App from Google App Store and Install It.
3. Pair
your “Android Mobile” and “HC – 05” Module before Opening the “Bluetooth Terminal” App
4.
After Pairing, open “Bluetooth Terminal”
App and Select “HC-05”.
5. If
successfully connected, "Connected
to HC-05” message will appear on the Application.
6. Now
send command as “1” or “0” to Turn ON/OFF LED.
It’s done!!
Now putting little bit extra effort we connect
AC appliance instead of LED?! But Extra
care should be taken when dealing with 240V, please don't attempt if you are
not confident. Here we go,
2nd Part: Controlling of AC Appliances Below are additional components to complete
this concept. But our earlier UNO code will work for this time. 1.
Relay – It will act as switch based on the command
from HC-05 module. 2.
Bulb (or) Fan – Relay will connect to this AC appliance. 3.
Electric Wires
Circuit Diagram: 
ü Connect to Relay in the place of LED, circuit diagram is given
below. (extn: Pin 8) ü Now send command as “1”
or “0” to Turn ON/OFF your AC appliance!!.
Note: Extra care should be taken when dealing with 240V, please don't attempt if you are not confident. Please your suggestions/queries/experiences to improve this article.
Hope this article gave an
idea on how to control AC appliances using Arduino, relays and HC-05 Bluetooth
Module. Thanks for reading this article.
|